
Fire Hydrant Exercise: The Ultimate Guide for Everyone
What is the Fire Hydrant Exercise?
The fire hydrant exercise is a bodyweight movement that mimics the action of a dog lifting its leg on a fire hydrant. It primarily targets the gluteus medius, the muscles located on the side of your hips. These muscles are crucial for stability, balance, and overall strength. While it may look simple, the fire hydrant exercise can be quite challenging and effective for improving your fitness level.
Why is it Called the Fire Hydrant Exercise?
The name comes from the way the exercise looks. When doing the move, you get on all fours, just like a dog, and lift your leg to the side as if you’re marking your territory. This playful comparison makes it easy to remember and adds a bit of humor to your workout routine. It’s a fun way to engage people in a fitness discussion, and who doesn’t like a good laugh while exercising?
The Benefits of the Fire Hydrant Exercise
Now that you know what the fire hydrant exercise is, let’s talk about why you should consider adding it to your fitness routine. Here are some benefits that come from doing this exercise:
1. Strengthens Glute Muscles
The primary muscles worked during the fire hydrant exercise are the glutes. Strong glutes are essential for various activities, from running to climbing stairs. When you strengthen these muscles, you improve your overall athletic performance. It also helps prevent injuries, especially in the lower back and knees.
2. Improves Hip Mobility
Hip mobility is vital for everyday activities, like walking, sitting, or even bending down. The fire hydrant exercise encourages your hip joints to move through their full range of motion. This increased flexibility can lead to better performance in other exercises and daily movements. Improved hip mobility can also help reduce stiffness and pain, making it easier to move throughout your day.
3. Enhances Core Stability
While the fire hydrant primarily targets the glutes, it also engages your core muscles. A strong core is essential for maintaining proper posture and balance. When you do the fire hydrant exercise, you’re not only working your hips and glutes but also stabilizing your body with your abdominal muscles. This dual action can contribute to overall strength and stability, which is beneficial in many sports and physical activities.
4. Easy to Modify
One of the best things about the fire hydrant exercise is its adaptability. Beginners can start with a simpler version, while more advanced practitioners can add weights or resistance bands. This flexibility makes it suitable for people of all fitness levels. If you’re just starting, you can perform the exercise without any added resistance. As you become stronger, you can introduce weights to increase the challenge.
5. No Equipment Needed
You don’t need any fancy gym equipment to do the fire hydrant exercise. You can do it anywhere: at home, in a park, or even in your office! This makes it a convenient option for busy people who want to stay fit. You can quickly squeeze in a few sets during your day without needing to head to the gym. All you need is a little space and your body!
6. Great for All Ages
The fire hydrant exercise is not just for young athletes; it’s suitable for people of all ages. Whether you’re a teenager, an adult, or a senior, you can benefit from this movement. It’s gentle on the joints and can help maintain strength and flexibility as you age. Plus, it’s a fun and engaging exercise that anyone can enjoy!
How to Perform the Fire Hydrant Exercise
Now that you know the benefits, let’s talk about how to do the fire hydrant exercise correctly. Here’s a step-by-step guide:
Step 1: Get Into Position
Start by getting down on all fours on a comfortable surface. You can use a yoga mat or a soft carpet to cushion your knees. Your hands should be directly under your shoulders, and your knees should be under your hips. Keep your back straight and your head in a neutral position, looking down at the ground. This position is essential for maintaining proper form throughout the exercise.
Step 2: Engage Your Core
Before you start moving, engage your core by pulling your belly button towards your spine. This action will help stabilize your body and protect your lower back during the exercise. Maintaining a strong core is vital for proper alignment and helps you get the most out of the fire hydrant movement.
Step 3: Lift Your Leg
Now, slowly lift your right leg out to the side. Make sure to bend your knee at about a 90-degree angle. Your foot should remain flexed, and your thigh should be parallel to the ground. Try to keep your hips square to the floor, avoiding any twisting or leaning. Imagine you’re trying to touch a fire hydrant with your knee – this visual can help guide your movement.
Step 4: Lower Your Leg
After lifting your leg to the side, hold the position for a moment, then slowly lower it back to the starting position. Make sure to control your movements, rather than just dropping your leg. This control helps to engage the muscles effectively and promotes better strength building.
Step 5: Repeat and Switch Sides
Aim for 10 to 15 repetitions on one side before switching to the other leg. After completing the set on your right side, switch to your left leg and repeat the same steps. This ensures that both sides of your body are equally strengthened. Remember, balance is key in any workout routine!
Tips for Performing the Fire Hydrant Exercise
Here are some handy tips to help you get the most out of your fire hydrant exercise:
1. Focus on Form
Always prioritize proper form over the number of repetitions. It’s better to do fewer reps with good form than to do many reps incorrectly. Good form ensures that you’re targeting the right muscles and helps prevent injury. Take your time to master the movement before increasing the intensity or number of repetitions.
2. Use a Mirror
If possible, perform the exercise in front of a mirror. This way, you can check your form and make sure you’re keeping your hips square and your back straight. Watching yourself can help you correct any mistakes and ensure you’re doing the exercise properly.
3. Breathe
Don’t forget to breathe while exercising! Inhale as you prepare to lift your leg, and exhale as you lift. This breathing pattern helps maintain focus and keeps your movements fluid. Remember, it’s essential to keep your breathing steady and relaxed, even when you’re challenging yourself.
4. Start Slow
If you’re new to this exercise, take it slow. Begin with just a few repetitions, and as you become more comfortable, gradually increase the number. It’s okay to feel a bit sore after your first few workouts, but you should never feel pain. Listen to your body and progress at your own pace.
5. Consider Adding Weights
Once you’ve mastered the basic fire hydrant exercise, you can add weights to increase the challenge. Ankle weights or resistance bands can be great options. Start with light weights, and as you build strength, you can gradually increase the weight. This additional resistance will help you tone your muscles even more effectively.
6. Incorporate into Your Routine
Try to incorporate the fire hydrant exercise into your regular workout routine. You can add it to your warm-up, include it in your strength training session, or use it as a standalone exercise. This versatility makes it easy to fit into various types of workouts.
Common Mistakes to Avoid
Even though the fire hydrant exercise is relatively simple, it’s essential to avoid a few common mistakes to ensure you’re getting the most benefit. Here are some pitfalls to watch out for:
1. Twisting the Hips
One of the most common mistakes is twisting your hips while lifting your leg. This can lead to poor form and reduce the effectiveness of the exercise. Keep your hips squared to the floor, and focus on using your glute muscles to lift your leg instead.
2. Arching the Back
Be careful not to arch your back while doing the fire hydrant exercise. Keep your back flat and maintain a neutral spine throughout the movement. This alignment helps protect your lower back and ensures that the focus remains on your hips and glutes.
3. Rushing the Movement
Take your time with each repetition. Rushing through the exercise can lead to poor form and limit the effectiveness of the workout. Focus on controlled movements, and try to feel the muscles working as you lift and lower your leg. Quality over quantity is key!
4. Not Engaging the Core
Engaging your core is crucial for stabilizing your body during the fire hydrant exercise. If you neglect your core, you may find it challenging to maintain balance and control. Remember to pull your belly button toward your spine before you start the movement.
5. Skipping the Warm-Up
Always warm up before starting any workout, including the fire hydrant exercise. A proper warm-up helps prevent injuries and prepares your muscles for activity. Simple movements like arm circles, leg swings, or light jogging can help get your blood flowing and loosen up your joints.
Variations of the Fire Hydrant Exercise
Once you’ve mastered the basic fire hydrant exercise, you can explore different variations to keep your workouts fresh and challenging. Here are some fun options to try:
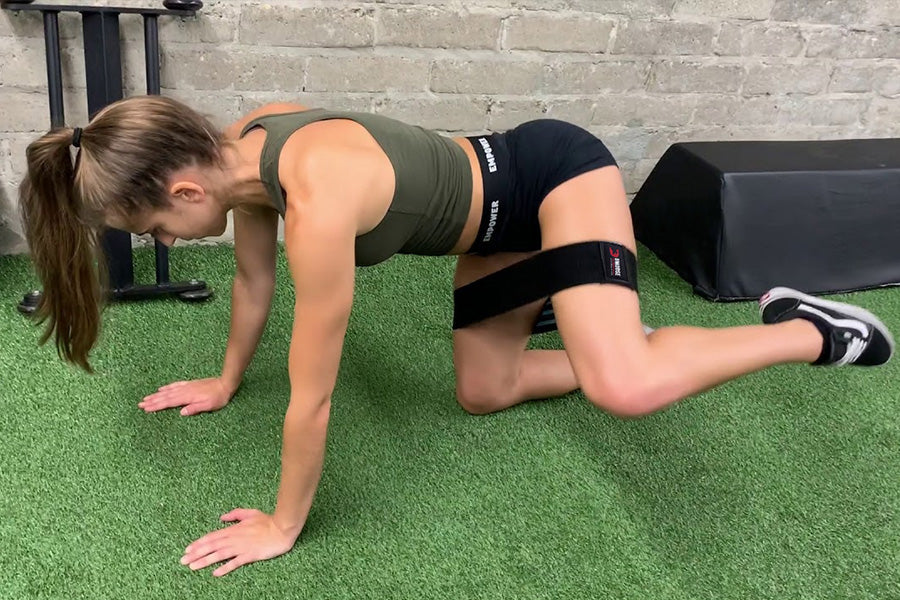
1. Fire Hydrant with Resistance Band
Adding a resistance band can significantly increase the challenge of the fire hydrant exercise. Simply place a resistance band around your thighs, just above your knees, and perform the exercise as usual. The band will create additional resistance, helping you engage your glutes even more effectively.
2. Fire Hydrant with Leg Extension
For an extra challenge, try combining the fire hydrant exercise with a leg extension. After lifting your leg to the side, extend it straight back behind you before bringing it back down. This variation targets the glutes and hamstrings, providing a more comprehensive workout for your lower body.
3. Donkey Kicks
The donkey kick is similar to the fire hydrant but involves lifting your leg straight back instead of to the side. Start in the same all-fours position, but instead of moving your leg to the side, lift it back while keeping the knee bent. This move focuses more on the glutes and can be an excellent complement to the fire hydrant exercise.
4. Weighted Fire Hydrants
If you’re ready for more of a challenge, you can add weights to your fire hydrants. Try using ankle weights or hold a dumbbell in your hand. Start with light weights and gradually increase the weight as you become stronger. This added resistance can help you tone your glutes and build strength more effectively.
5. Side-Lying Leg Lifts
While not technically a fire hydrant, side-lying leg lifts are another excellent exercise for targeting the glutes. Lie on your side with your legs stacked and lift your top leg up and down. This move complements the fire hydrant by working the same muscle groups from a different angle.
Conclusion: Get Moving with the Fire Hydrant Exercise
The fire hydrant exercise is a fun and effective way to strengthen your glutes, improve hip mobility, and enhance overall core stability. Its playful name makes it an engaging addition to any workout routine, and its adaptability means that people of all fitness levels can benefit from it.
Whether you’re a beginner or a seasoned fitness enthusiast, the fire hydrant exercise can fit seamlessly into your routine. Remember to focus on form, start slow, and have fun with it! So next time you think about getting stronger, remember the fire hydrant exercise and all the benefits it brings. Happy exercising!